Run Your React Native App on Your Device: A Step-by-Step Guide
Hi There, have you recently started working with React Native and trying to run your app on your device for the very first time. Today we’ll be going to see how can we set up a React Native basic app and how to run it on your android device.

Software required to run React Native
You need to install these software/ applications to run your first react app.
- Node (Node 18 or newer)
- Watchman
- JDK (Java Development Kit JDK 17)
- Android Studio
- Configuring the ANDROID_HOME environment variable
- Xcode (Only if you're running your app on an iOS device)
Installing listed software packages
Use listed apps to install the packages
1. Install Node and Watchman
Note: Watchman is a tool by Facebook for watching changes in the filesystem. It is highly recommended you install it for better performance.
Mac
brew install node
brew install watchman
Windows
choco install -y nodejs-ltsCheck If the node and watchman are properly installed by checking its version.
Check Node version — node -v
Watchman — watchman -v
Note: If you’re having older version of node than node18 then update it
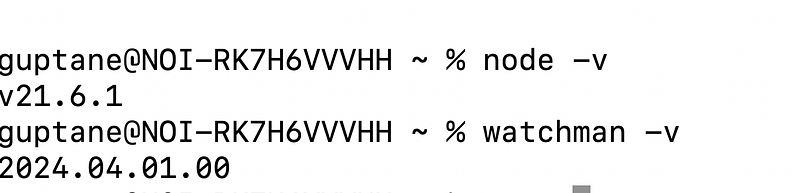
It should look something like this, you may have a different version.
2. JDK
You can download JDK 17 by visiting oracle website JDK17.
We’re using JDK 17 as it is suggested in React Native documentation, and They’ve also stated in documentation that there might be some issue while using newer versions. You can refer to the documentation from here.
You can also use CLI to install the JDK using the command given.
MAC
brew install openjdk@17Windows
choco install -y microsoft-openjdk17After installation for verifying that JDK is successfully installed, run the version command and check for Java version in your machine.

3. Android Studio
You can install android studio from Android’s website. It’ll download a DMG file for mac or EXE file if you’re using windows, which you can run and install the android studio.
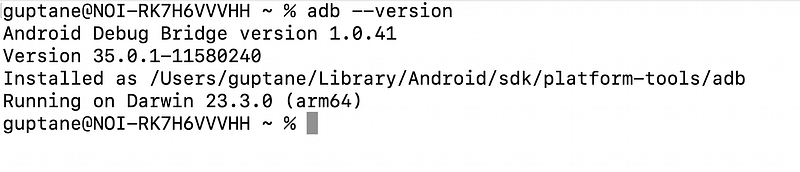
NOTE: Setup ANDROID_HOME version first as mentioned below and then check for adb --versionto get it runningOnce it's downloaded, make sure that adb --version this commands returns you a version as shown in image.
If you’re getting command not found issue, it is very common, and it means that ADB is not downloaded when you install Android studio. For resolving this issue, follow the listed steps.
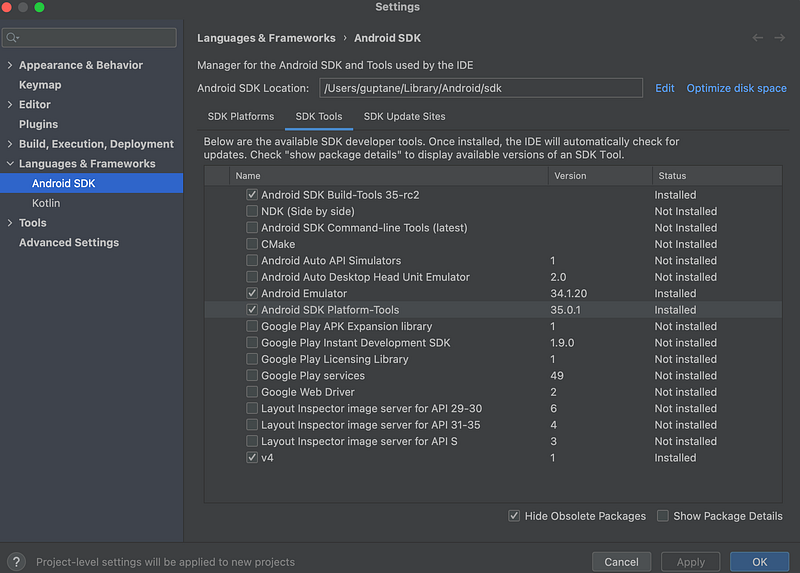
- Open your android studio
- Click on More Actions
- Select SDK Manager.
- Make sure that the packages present in the image must be there, if not, click on the checkbox and once those packages are selected click OK to download them.
5. Restart your terminal and then check for the ADB version again adb --version If everything is properly installed now you’ll be getting the version.
These listed are Android SDK CLI tools for managing emulators, deploying apps and interacting with devices.
adb: The Android Debug Bridge for device communication, installing/uninstalling apps, and more.avdmanager: Manages Android Virtual Devices (AVDs) used for emulated testing.sdkmanager: Installs or updates Android SDK components and tools.
4. Configuring the ANDROID_HOME environment variable
Once we have installed the android studio. We need to configure some of the environment variables in order to build apps with native code.
Mac
- Open your
~/.zshrcfile.
nano ~/.zshrc2. Add these PATHS to your ~/.zshrc file
export ANDROID_HOME=$HOME/Library/Android/sdk
export PATH=$PATH:$ANDROID_HOME/emulator
export PATH=$PATH:$ANDROID_HOME/platform-tools
Verify that ANDROID_HOME has been set up properly by running echo $ANDROID_HOME and the directories have been added to the path by running echo $path
Windows
- Open the Windows Control Panel.
- Click on User Accounts, then click User Accounts again
- Click on Change my environment variables
- Click on New… to create a new
ANDROID_HOMEuser variable that points to the path to your Android SDK:
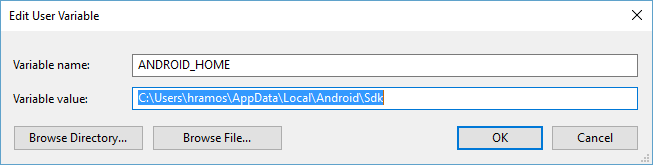
The SDK is installed, by default, at the following location:
%LOCALAPPDATA%\Android\SdkYou can find the actual location of the SDK in the Android Studio “Settings” dialog, under Languages & Frameworks → Android SDK.
Open a new Command Prompt window to ensure the new environment variable is loaded before proceeding to the next step.
- Open PowerShell
- Copy and paste Get-ChildItem -Path Env:\ into powershell
- Verify
ANDROID_HOMEhas been added
Creating a new application
React Native has a built-in command line interface, which can be used to generate a new project.
If you previously installed a global react-native-cli package, please remove it as it may cause unexpected issues:
npm uninstall -g react-native-cli @react-native-community/cliLet’s create a new React Native project. Run the following command with the project name you want to give, I have taken the name MyFirstReactNativeProject
npx react-native@latest init MyFirstReactNativeProjectWe’ll need a device to run our React Native app. I am running it on android, so I’ll explain how I have configured my android device to run my project.
Configuring Android device to run app on it
We’ll use USB debugging to run the app on the android device, to do so we’ll need to enable USB debugging option in developer tools, follow the steps to enable it.
- Enable developer options in your phone by tapping 7 times on build number. You can find the build number by going in
Settings > About phone > software information > build number
If you are unable to find build number on your device, then search on Google “where to find build number in Samsung”. Similarly, You can check for your device.
After tapping sometimes on build number, developer options will be enabled in your phone.
2. Go to developer settings it must be present in advance settings in your device or directly under settings, You can again google for finding developer options in your device.
3. Once you’re inside settings, enable the USB debugging option.
4. Also check for Default USB configuration option and If it's present, set it to file transferring mode.
5. Connect your phone with your Mac or windows through a cable. Slide down to the notification section in your device, you must be getting some option for USB and set it to file transfer if it is set to battery charging or anything else and If you are getting any popup for permission to access, do allow that.
6. Check for your device in the available devices using command
adb devicesIf your device is coming in the list it means you’ve done everything right, but if not then try changing your cable or checking if the USB option is enabling and set to file transfer.
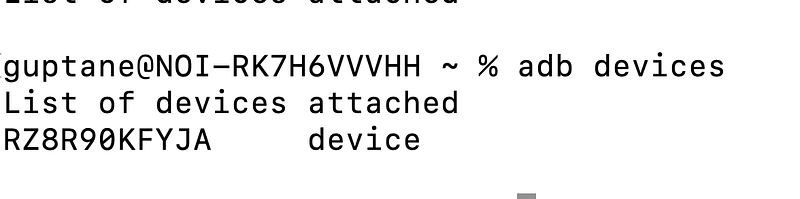
Note: If you see unauthorized in the list you will need to runadb reverse tcp:8081 tcp:8081 and press allow USB debugging on the device.Note: You must have only one device connected at a time.
Running app on Android device
- Start Metro
Metro is the JavaScript build tool for React Native. To start the Metro development server, run the following from your project folder:
npm start2. Start your app
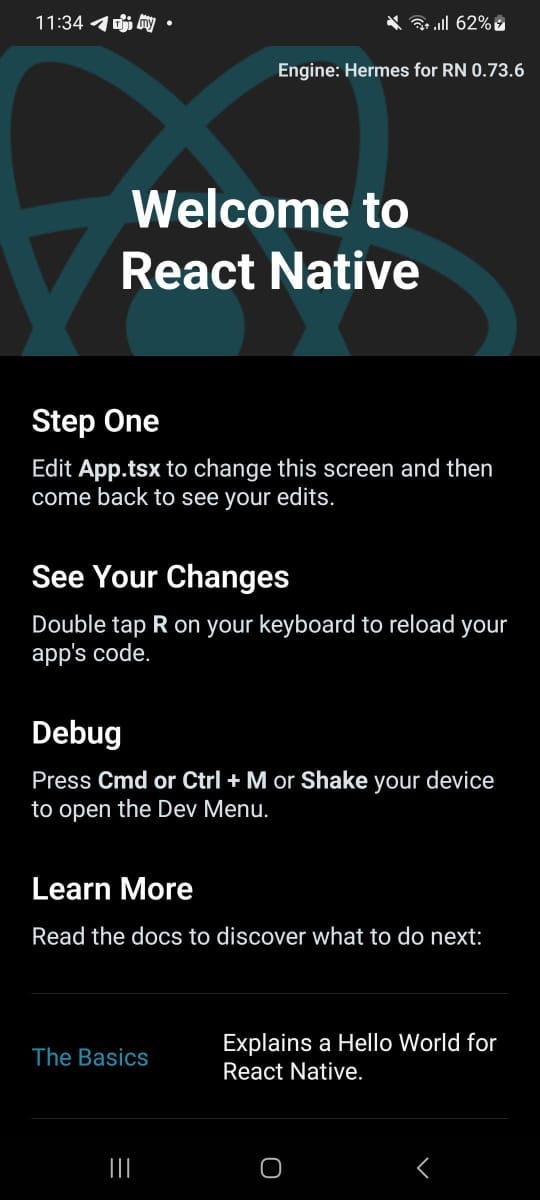
npm run androidIf everything is set up correctly, you should see your new app running in your Android device shortly.
You will see something like this, and now you can make changes in your application, and you can see it here on your android device.
Task to take home
Make some changes in your App.tsx file and see how your changes are coming on your device.
Queries
Hope you have enjoyed leading it and learnt something new and valuable from this article today.
Now If you have any doubts or queries feel free to drop a comment or connect with me on my Topmate.
You can also reach out to me on my LinkedIn and follow me for updates on latest blogs.
Please do like this post if you enjoyed reading it.
Thanks for the read :)
Also, you can support me and my writings by treating me to a nice virtual cup of coffee ☕️
In Plain English 🚀
Thank you for being a part of the In Plain English community! Before you go:
- Be sure to clap and follow the writer ️👏️️
- Follow us: X | LinkedIn | YouTube | Discord | Newsletter
- Visit our other platforms: Stackademic | CoFeed | Venture | Cubed
- More content at PlainEnglish.io