Introduction to CSS and How to build a webpage
A beginners guide to web development. If you’ve always wanted to learn how to build a website, then you’ve come to the right place!
A website comprises of multiple webpages and how do we build a webpage? Yes, using HTML, CSS, and JavaScript. Today, we’ll focus on understanding the role of CSS in a website.
Table of Contents
- What is CSS and Why to use
- CSS syntax
- Types of selectors
- How to insert CSS in a webpage
- Precedence of selectors
- Additional Resources
- Task to take home
What is CSS and Why to use
CSS, short for Cascading Style Sheets, plays a crucial role in web development by applying styles to HTML webpages. In the analogy of HTML being the skeleton of a webpage, CSS serves as the skin that covers the skeleton and makes it presentable to users.
To put it simply, CSS is a language that enhances the visual appeal and aesthetics of websites or webpages.
Let me illustrate this concept with an example to provide better clarity. Have you ever encountered a pink-colored Google homepage? Most likely not. Let me show you.

This demonstration highlights how CSS enables developers to customize the appearance of elements on a webpage, ensuring a visually pleasing and user-friendly experience for visitors.
In this image, you can see the pink background behind Google that I’ve added using CSS only.
Just a heads up: you can easily recreate this Google search homepage using basic HTML and CSS. Let’s walk through it together.
CSS Syntax
To style the structure we’ve built using HTML, we employ CSS rules. CSS rules consist of a selector and its declaration block. The declaration block, in turn, consists of key-value pairs known as properties and their corresponding values.
For instance, in the previous example where we added a background color, we needed to specify the element to which we wanted to add the background color. The property we used was background-color, and the value was the color we desired. In our case, we used pink.
Take a look at the image below for a clearer understanding:
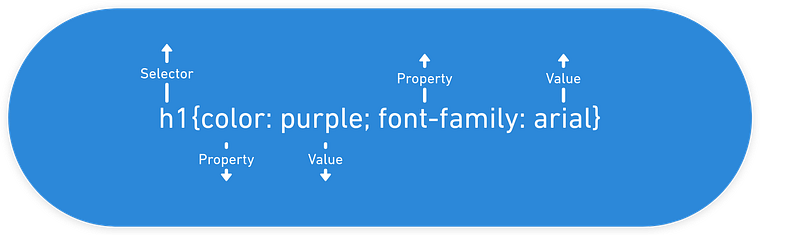
This visual representation should help solidify the concept of CSS rules and how they are applied to HTML elements to style webpages.
Selector: This refers to the HTML element on which we intend to apply the CSS. For example, selectors can include h1, h2, div, span, img, etc.
Declaration: This consists of the properties that we want to apply to the selected HTML element. For instance, a declaration might include color: red, where color is the property and red is its value.
Note: Later in this post, we’ll explore how to target HTML elements using classes and IDs, providing even more flexibility and specificity in styling our webpages.
Types of selectors
CSS selectors are like instructions that tell the browser which parts of a webpage to style. They help pinpoint exactly which elements should look a certain way, allowing designers to customize the appearance of text, images, and other content on the page.
Here are the list of selectors
- HTML SELECTOR: These are selectors that directly target HTML elements. In simple terms, we apply styles by specifying properties directly on HTML tags. Some common HTML selectors include
h1,div,span,img, anda.
h1 {
 color: red;
}

/* This CSS rule will make all <h1> elements on the webpage have red font color.*/
2. CLASS SELECTORS: A class in HTML is like a label you can give to elements to style and control them using CSS and JavaScript.
Think of it like assigning a task to a whole class in school. If an assignment is given to a class, it means it applies to all the students in that class. Similarly, in HTML, elements with the same class share the same set of properties and styles.
<div class="content-section">Some content ….</div>In CSS
.content-section {
 background-color: red;
}
his CSS rule applies a red background color to all elements with the class “content-section”.
NOTE: We use a dot (.) before the class name to select HTML elements with that class. If you apply this class to multiple elements, all those elements will have the specified background color (or any other properties targeted in the class).
3. ID SELECTOR: An ID selector is used to select a unique HTML element on a page. As the name suggests, an ID should be unique within a page, so the ID selector targets only one specific element.
Think of it like assigning a task to a particular student in a school class. Each student has a unique ID, so if an assignment is given using the student’s ID, it applies only to that specific student.
#content-id {
 background-color: red;
}
This CSS rule applies a red background color to the HTML element with the ID “content-id”.
NOTE: We use the hash symbol (#) before the ID name to specify it in CSS. An ID should be unique within the HTML document, and using it allows you to target and style a specific element uniquely.
4. Universal Selector:
The universal selector (*) in CSS selects all elements on a page. When applied with CSS properties, it sets those properties for every element unless overridden by more specific CSS rules or default browser styles.
* {
 font-size: 16px;
 color: blue;
}
With this CSS rule, all elements in the document will have a font size of 16 pixels and a font color of blue unless explicitly specified otherwise in other CSS rules or by default browser styles.
How to insert CSS in a webpage
There are several ways to apply CSS to elements on a webpage:
- Inline CSS: Inline CSS is applied directly to a specific HTML element and is only applicable to that element. Here’s an example:
<span style="background-color: yellow;">I create an inline container</span>In this example, the <span> element has an inline style attribute (style="background-color: yellow;"), which sets the background color of the text within the <span> to yellow. This style will only affect this particular <span> element and won't be applied to any other elements on the webpage.
2. Internal CSS: In this we declare the style in an HTML page so that it is applicable to that page only.
<!DOCTYPE html>
<html lang="en">
<head>
 <meta charset="UTF-8">
 <meta name="viewport" content="width=device-width, initial-scale=1.0">
 <title>Introduction to CSS</title>
 <style>
 h1, h2 {
 color: red;
 }
 </style>
</head>
<body>
 <h1>Introduction to CSS</h1>
 <h2>CSS Syntax</h2>
</body>
</html>
Now all the h1 and h2 declared in this webpage will have a font color of red.
3. External CSS: CSS that is written in a separate file with .css extension which we call a stylesheet and then we import that stylesheet in our html file.
<!DOCTYPE html>
<html lang="en">
<head>
 <meta charset="UTF-8">
 <meta name="viewport" content="width=device-width, initial-scale=1.0">
 <title>Introduction to CSS</title>
 <link rel="stylesheet" href="link_to_your_stylesheet">
</head>
<body>
 <h1>Introduction to CSS</h1>
 <h2>CSS Syntax</h2>
</body>
</html>
In this line, <link> is an empty element used to link external resources such as stylesheets, and the rel attribute specifies the relationship between the current document and the linked resource, which in this case is a stylesheet. The href attribute specifies the URL or path to the external stylesheet file. Replace "link_to_your_stylesheet" with the actual URL or path to your stylesheet file.
Precedence of selectors
Precedence of selectors determine which style will be applied to an element when there arre multiple conflicting rules.
Here is the general heirarchy from highest to lowest precedence.
- Inline CSS: Styles applied to direct html will have highest precedence over others.
- ID selectors: ID selectors have higher precedence than class selectors and element selectors.
- Class Selectors: Styles applied to elements using a class attribute.
- Element Selectors: Styles applied to all instances of a specific HTML element.
- Universal Selectors: Styles applied to all elements on the page.
- Specificity: multiple rules with the same specificity are targeting the same element, the last applied rule takes precedence.
- !important Rule: Adding
!importantto a CSS rule gives it the highest precedence, even over inline styles.
.some-class {
 color: yellow !important;
}
Understanding selector precedence is crucial for effective CSS and to avoid any unexpected behavior.
Additional Resources
- You can always reach me out on Linkedin or Topmate for any doubts
- W3school is one of the good platform for getting other aspects of CSS. Even though sometimes it doesn’t make it that clear but yeah it is overall helpful.
- You can also watch this youtube video for better understanding of the concept.
Task to take Home
Here is the list of some of the commonly used CSS properties.
background, color, font-family, height and width, padding, display, margin, border
Your task is to:
- Find out what these properties do and Why we use them?
- Try to build the Google’s homepage whose image I’ve attached earlier. It’s a very basic and simple exercise to do.
Reading only, won’t do you any good. Let’s put knowledge into action!
You have to try and implement what you have learnt and I know you can do it😉
If you have any difficulty or any doubts feel free to reach me out via my topmate or linkedin
Thanks for the read :)